 |
| Wilfred |
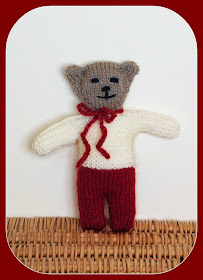
Wilfred - Teddy Bear
The Front
Begin with the Trousers
Leg
1 ~
Cast
on 9sts and work 16 rows in stocking stitch (knit one row, purl one row)
Break
off yarn, leave stitches on the needle
Leg
2 ~
Cast
on 9sts and work 16 rows in stocking stitch (knit one row, purl one row)
Top
of the Trousers ~
Knit
across leg 2, then leg 1 (18sts)
Work
9 more rows in stocking stitch, starting with a purl row
Sweater
~
Continue in a second colour
K2tog,
knit to last 2sts, k2tog (16sts)
Knit
10 rows
Arms
~
Knit
across the next row, then cast on 12sts (28sts)
Knit
across the next row, then cast on 12sts (40sts)
Knit
9 rows
Cast
off 15sts, knit to end of row (25sts)
Cast
off 15sts, knit to end of row (10sts)
Head
~
Continue in a face colour
Knit
1 row
Purl
1 row
S1,
kfb, knit to last 3sts, kfb, k2
Purl
1 row
Repeat
the last 2 rows 4 times more (20sts)
Work
6 rows in stocking stitch (knit one row, purl one row)
Cast
off
Make
another piece the same for The Back
Sew
together the Front and the Back around the Trousers and Sweater
Stuff
the body with polyester toy filling
Join
the top of the head
Make
the Ears ~
Using
a length of the yarn used for the head, create ears by sewing a line across the
top of the head at each side.
Add
features to the face
Sew
together the head, leaving a gap to add the filling to the head
Stuff
the head with polyester toy filling
Sew
the gap closed.
Add
a crochet chain scarf if desired
 |
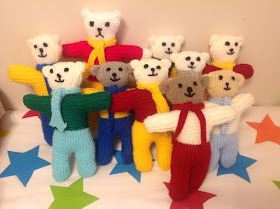
| These wonderful teddies were knitted by Enid Loft - a member of my facebook group. They are so cute - I just had to share them ! Well done Enid. |
I am happy for you to use my patterns for your own use or for charity donations.
In addition: You can gift or sell any finished items you make from my patterns.
However, please do not copy my patterns
Copyright © 2017 ‘made by marianna’ All Rights Reserved
This pattern (the information and photos) may not be copied or reproduced
or republished on another webpage or website.


Beautiful, looking forward to doing this tonight.
ReplyDeleteHe's lovely. Last time I tried to make a bear it looked more like a mouse so I made it a tail! This one looks more like a bear to me. Will have to try it. Thank you.
ReplyDeleteHow lovely he's so cute, Marianna you never cease to amaze me, do you ever sleep? :) xx
ReplyDeleteThese teddy bears are so cute. Maybe I can make them up with my left over bits and bobs. Thank you.
ReplyDeleteHow do you make the second piece for the top anyone I've never made a teddy before and would really love to make this thanks in advance
ReplyDeleteGot it now everyone didn't read instructions right x
ReplyDeleteStill don't get the ear bit though x
ReplyDeleteDoes anyone have any clothes patterns to fit wilfred looked on loads of sites and can't find any x
ReplyDeleteMarianna, You are amazing, I always rave about your patterns to all my knitter friends.
ReplyDeleteTHANK YOU so much, enjoy your day!
Marianna, I am still confused about the ear part. I never had any problems with your patterns they are always so well written but I am missing something here. Can you please shed some light.
ReplyDeleteAgain, I appreciate so much
I haven't made this pattern yet Rajni Ohri but I have made things using a similar technique. The head is made more or less a square and to make the ears, you flatten the head "square" and stitch a diagonal section on either side of the top of the head (square section) which form the ears. It's like stitching a triangle shape for the top left and top right of the head section. I hope this helps.
ReplyDeleteNot sure how to knit across then cast on 12 for arms
ReplyDeleteNot sure how to cast on 12 after knitting across for arms
ReplyDeleteDepending on which cast on method you use - you may have to turn your work to cast on.
DeleteI've made a few in different colours and I love making them 🥰 thank you for sharing.
ReplyDelete