.

Monday, 29 April 2013

Granny Square Blanket

Well it's a CLASSIC ........


and a great way to use up lots of yarn.


I had no particular colour theme ~ just used white for the outside row of each square.
 It used up most of my DK yarn stash and even though I am stashbusting I must confess that I ordered more online. Oh well.
 
For this project I used an ergonomic soft grip crochet hook as I have noticed lately that my hand gets painful if I crochet a lot.
I found the hook comfortable to use and I do think it helped.
 
 
 I love the completed project ~ it is so colourful
 

classic granny square blanket


Sunday, 28 April 2013

Tangled Bits to Tidy Bobbins

How do you store your left over small amounts of yarn?
 
When you need just a little length to make a little flower adornment, or to embroider a face on to a toy you have just completed,
do you have to search through a tangle of bits and small balls?
 
It's so frustrating when you know you have just the colour you need .... somewhere .... but where ? !
 
So here is my solution ~


BEFORE                   ~                   AFTER
 
I decided to tidy up by bag of small balls today.
I started by cutting out some bobbin shapes from card ~
 
 
 Then I wrapped each length of yarn onto a bobbin ~
 
 
catching the loose end into a 1cm cut made at the top ~ to keep each neat & tidy and to stop them from unravelling and tangling up
 
 
I found a pretty basket to put them into ~
 
tidy bobbins
 
 
Now when I am looking for a particular colour it will be so much easier to find


Tuesday, 23 April 2013

Yin and Yang


I am a contradiction

yin and yang


Although I am no longer a young woman  ~ I certainly don’t feel old !

I like to keep up-to-date:  I  am interested in music and fashion,

I have embraced the ‘modern’ world of technology  ~

I had one of the first gameboys when they were considered to be the a teenager’s craze !

I worked out how to do the facebook thing when it was in it’s early days -  and surprised my teenage daughters by sending a friend request.

I love ebay, craft forums, ravelry , pinterest & blogging.  Who doesn’t ?

And yet ……….
 
 
And yet I love beautiful old vintage things too.

They are sometimes shabby and worn with use – but they are often lovely still - in my eyes.

I have a collection of knitting pattern leaflets from the 1950s and 1960s onwards.

I love them – I love looking at the style of the photos and although they were designed to be made in classic white and pastel colours many of them still look good today.
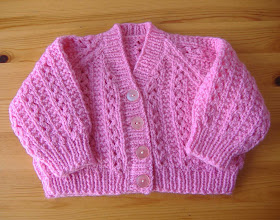
One of my particular favourite ‘oldies’ is this one ~
It has a shop inkstamp for 1979.
 

I have knitted this little cardigan for a multitude of new arrivals and I never grow tired of making it.
 
pink cardigan

The style may well be from decades past but it still stands up well to the test of time.
 
white cardigan

Yin and yang are complementary, not opposing, forces.
There is a place for the old as well as for the new


What 'old favourites' do you have ?


Monday, 22 April 2013

Sage Green Infinity Scarf

Sage Green is a very pretty colour.

I found a couple of balls in my yarn stash, and knew it was time to use it !
 
As it is a boucle yarn I knitted it in a simple garter stitch (knit every row).
Larger than normal needles gave a pleasing open texture.
I knitted until I was almost out of yarn then cast off and joined the short edges together.
 

This infinity scarf / cowl used 80g of yarn.


Sage plants have a small deep vibrant dark blue / purple flower so I decided to add a detachable flower motif in this colour.


Flower Motif

Small amounts of yarn –
A             Yellow
B             Deep Purple / Blue
C             White

Using A, make 3ch, join with ss into a ring,

1st Round             Ch2, 11tr in ring, ss to complete round, fasten off

2nd Round            Join in B , ch2, 4tr in first st,  
                         ss in next st,

 *ss, ch 2, 4tr in next st,

ss in next st, *

repeat from * to * around the rest of the round, fasten off 
(this makes 6 petals in total)

3rd Round            Join in C, with a ss in first ss from previous round

                                * Ch9, ss into next ss from previous round*

                                Repeat all around , fasten off

Darn away ends securely


Thursday, 18 April 2013

Welcome Aboard


I love the nautical look ~ it makes me think about holidays. There is nothing I like more than being in the sunshine at the seaside somewhere: feeling soft warm sand between my toes...... listening to the sound of the waves, children playing & the seagulls calling ..... smelling the sea ..... watching boats 'dancing' and the sunshine glittering on the water......... 

Oh well we can all dream!  It seems to have been a long winter and, although officially spring is here, summer still feels a long way off.

But I notice that there are loads of linen trousers and blue & white striped tops in the shops at the moment. A promise of warmer days to come. I couldn't resist and bought a couple of t-shirts and cardigan jackets in navy & white.
But I love bold colours so I decided to use a couple of balls of red cotton yarn, that has been in my stash for some time, to make myself a scarf to wear with them.

Most of my knitting & crochet is for charity. I make hats, scarves, baby clothes & blankets. They are made with love - and given away with love - in the hope that by my small actions the world will be a tiny bit happier for someone somewhere.
It is years since I made something for myself.


And what's more ~ I love it.
 
 
The stitch is lacy ~ but quick to learn and easy to do ~ as every row is the same!


Can't wait to wear it


even if it won't be on a yacht !
 
'welcome aboard' one row red scarf


I based my pretty scarf on this one -
 

One Row Lace Scarf
By Turvid
Needles: 6 mm (US 10).

Use bigger needles than the yarn usually calls for.

Gauge (not important): 8 sts = 5 cm (2 inches) in pattern.

Skill level: Easy(/Intermediate)

Note: This will make an (unblocked) width of about 13 cm (about 5 inches). To increase the width: add 4 or more stitches, dividable with 4. The scarf is very stretchy, but you could use a bigger/smaller needle size, thicker/thinner yarn or adjust the stitch count to get a different size.

K= knit
K2tog= knit 2 stitches together
YO= Yarn over
Sts= stitches

Pattern:

Cast on 24 sts (or any number of stiches dividable with 4
).
I did 28sts on 4.5 mm needles for my scarf

Knit 2 rows

Knit pattern row:     K4, (YO, K2tog, K2) repeat between ( ) 5 6 times.

Repeat the pattern row until your scarf is at the desired length.

Knit 1 row.

Cast off loosely.

Finishing:

Weave in ends. Block if you want to.


Happy Days !


Tuesday, 16 April 2013

BLOOMing LOOMing ~ not for me!

I know a lot about knitting ...... and I enjoy passing on my skills. I run a knitting & crochet club for students & staff in the school where I work. It's good to inspire others and I am always looking for something new.
I can knit lacy patterns, cables, Fair Isle, intarsia and ............ lots more!
Isn't knitting GREAT ?
 
But I have never tried loom knitting ~ so I thought it was about time I gave it a go.  


Looms can be circular, square or straight.
 
I got myself a straight loom and settled down with some pretty yarn and a tutorial or two - I found some good instructions at http://lovintheoven.com/2013/02/diy-how-to-use-a-knitting-loom-to-make-an-infinity-scarf.html


And I began ~ full of excitement to be learning a new technique ......
I have seen some lovely garments and blankets made by this method. 
 
I followed the instructions and soon I understood how the loom knitting works ......
 
I wasn't sure about tension, so to tried a practice first - but it seemed to work up evenly so that wasn't a problem.
 
I decided that the yarn I had chosen would make a pretty scarf - and as I did not want it to be as wide as the loom I started for real this time without using all of the pegs.
 
loom knitting


I tried using the hook,
and also tried just using my fingers and found that was quite easy and a bit quicker.
 

BUT ....... it was all so   s - l - o - w
 
I could have knitted 6 times as much using normal needles. 
 
Feeling a bit frustrated I made myself a lovely mug of coffee and had a bit of a think. All new techniques are slow of course but I realised that I would never build up enough speed to make this feel worthwhile.
 
And I recognised too that there was no 'rhythm'. One of the lovely things about knitting for me is that I get into a rhythm and I enjoy it.


Well - no surprise then -
the loom and yarn are now in a bag in the cupboard.
Goodness knows when, if ever, it will see the light of day again.
 
It was good to learn a new skill ...... but LOOMing is not for me.


Sunday, 14 April 2013

Cute Crochet Baby Cardi

I love making baby clothes ~ they give such a quick reward!


When I find a pattern I like I make several and play around with colours and finishing touches. 
 

The addition of pretty buttons or a little crochet flower make each one individual.


3-6 months size...
DK yarn
4mm hook 

Ch 42

R1: Dc in 4th ch from hook and in the next 4 ch, (dc, ch1, dc) in the next ch, dc in the next 6 ch, (dc, ch1, dc) in the next ch, dc in the next 12 ch, (dc, ch1, dc) in the next ch, dc in the next 6 ch, (dc, ch1,dc) in the next ch, dc in the last 6 ch.

R2-8: Ch2, turn * dc in each st to ch1-space, (dc, ch1, dc) in the ch 1-space, repeat from * dc in each remaining sts.

R9: (dividing row for sleeves) Ch2, turn, * dc in each ch to the ch1-space, dc in ch 1-space, skip to the next ch1-space, dc in ch1-space * repeat one more time, dc in remaining sts.

R 10-16: Ch2, turn, dc in each st across (do not fasten off)

Edging:

Ch1, turn, sc in each st across, 2 sc in each side, 1 dc in each neck chain, with 3 sc in each corner, fasten off with a slip st to the first sc.
Add a second row in a contrasting colour if desired.

Fasten with a button or two ~ or with a chain tie (40ch) added to each neck corner


These little short sleeved cardis are based on ~ 
 
Have fun